Fire Damage Inspection Steps
Dealing with Fire Damage Restoration? Here’s a quick guide to inspecting your property safely and thoroughly after a fire. Follow these steps to identify visible and hidden damage, ensure safety, and prepare for restoration and insurance claims:
- Prioritize Safety: Only enter after authorities clear the area. Wear protective gear (N95 mask, gloves, boots) to avoid hazards like toxins, debris, or unstable structures.
- Walk the Property: Start with a visual inspection. Document fire, smoke, soot, and Emergency Water Damage Checklist: First 24 Hours with photos and notes.
- Check Structural Integrity: Look for cracks, sagging beams, or warping in walls, floors, and ceilings. Use tools like What Is a Moisture Meter the Best Measurement or thermal cameras to uncover hidden issues.
- Inspect Electrical and Plumbing Systems: Turn off power and look for scorched wires, damaged panels, or corroded pipes. Call professionals if needed.
- Address Moisture and Mold: Water used to fight fires can lead to mold in 24–48 hours. Use dehumidifiers and remove soaked materials quickly.
- Document Everything: Take detailed photos and videos for insurance claims. Organize records by severity and type of damage.
Why this matters: Hidden hazards like weakened structures, electrical risks, or mold can worsen if ignored. A thorough inspection ensures safety, smoother restoration, and accurate insurance claims.
Fire Damage Assessment Post-Cleanup: How to Document Every Detail
Step 1: Check Safety Before Entering
When dealing with fire-damaged properties, safety should always come first. These areas often hide dangers that can lead to serious injuries. Enter the property ONLY after receiving clearance from local authorities. As LA County Recovery advises:
"Before entering any area that has been severely damaged or destroyed by a wildfire, ensure that local authorities have cleared the area for entry. Once you receive clearance to enter a burned area, take appropriate precautions to protect your health and safety."
If you come across a color-coded sign posted by a building inspector, stop and get clear instructions about what it means before moving forward. Once cleared, start by inspecting the property’s perimeter to identify any external hazards.
Look for Outside Dangers
Start by walking around the perimeter of the property, keeping a safe distance from the structure. Fire damage often affects more than just the building itself. Watch for signs of instability, like crumbling walls, visible cracks, or missing support beams, which could indicate structural risks. As Gina Peek, Assistant Director at Oklahoma State University Extension, explains:
"There could be structural damage, as well as damage to utilities and electrical, plumbing and heating and cooling systems."
Be vigilant for downed power lines, damaged electrical equipment, or sparking wires. If you smell natural gas or hear a hissing sound, leave immediately and contact the fire department. Other hazards to watch for include charred trees, weakened power poles, smoldering debris, live embers, and hidden ash pits. Additionally, keep in mind that animals may have sought shelter in the damaged structure, which could pose unexpected risks.
Wear Protective Equipment
Protecting yourself is just as important as inspecting the property. Fire-damaged areas can expose you to toxic substances, unstable debris, and harmful airborne particles. Equip yourself with the right gear: a properly fitted N95 or P100 respirator (or a full-face respirator if necessary), disposable flame-resistant coveralls, layered gloves (nitrile under cut-resistant), sturdy closed-toe boots with puncture-resistant soles, and safety goggles with a tight seal. Depending on the situation, you may also need a hard hat, flashlight, first-aid kit, and hearing protection for noisy environments.
Make sure you know how to properly put on, take off, and maintain your protective equipment. As Ami Acheson from AdjusterPro® reminds us:
"Fire claims aren’t just about checking out damage and snapping some photos. Well…they are, but let’s do it safely."
Step 2: Do a Visual Walk-Through
Once safety is confirmed, take a careful walk through the property to document visible damage. Use photos and notes to capture everything you see. Moving room by room, start with the least damaged areas and work your way to the most affected. This method helps you maintain a clear perspective on the overall damage. Be thorough – fire damage often extends beyond what’s immediately visible. This detailed record will also set the stage for deeper inspections of structural and system issues later.
Record Fire, Smoke, and Soot Damage
Documenting the different types of damage will help clarify the scope of restoration. Fire damage often shows up as charring on wooden beams, melted materials, or items that appear blistered, warped, or disintegrated. Be sure to note these details, along with soot deposits and discoloration on surfaces.
Smoke damage leaves behind sticky or powdery residue, a lingering smoky odor, and discoloration throughout the property. Over time, smoke can cause acidic corrosion, which eats away at structural materials.
Soot damage is typically visible as black, flaky, or powdery deposits. You might also notice discoloration in shades of yellow, gray, or black on walls and ceilings. Don’t forget to check hidden areas like attic insulation for signs of soot or burnt smells, as smoke often seeps into these spaces.
To spot soot or smoke residue, use a white cloth or shine an angled flashlight on surfaces. Pay close attention to areas that feel sticky, greasy, or are covered with fine, powdery dust.
Find Water Damage from Fire Suppression
Fire suppression efforts, especially sprinkler systems, can release 20–40 gallons of water per minute, often leading to significant water damage. Addressing this secondary damage quickly is crucial to avoid structural issues and mold growth.
Look for standing water in basements, lower floors, or areas directly beneath sprinkler activation points. Check for signs of wet carpeting, drywall, or other materials that absorbed water during the firefighting process. Stains on ceilings, walls, or floors near sprinkler heads can indicate water flow patterns. Additionally, listen for hissing or dripping sounds within walls or ceilings, which may point to hidden water damage.
Mold and mildew can start forming within 24 to 48 hours in damp conditions, so keep an eye out for early signs. Porous materials like drywall, insulation, and wooden components are especially vulnerable to water absorption.
Take detailed photos and videos of all damage, making sure to note dates and conditions. It’s also a good idea to document any pre-existing issues to differentiate them from fire-related damage. This comprehensive record will be essential for assessing structural and system integrity in the next steps.
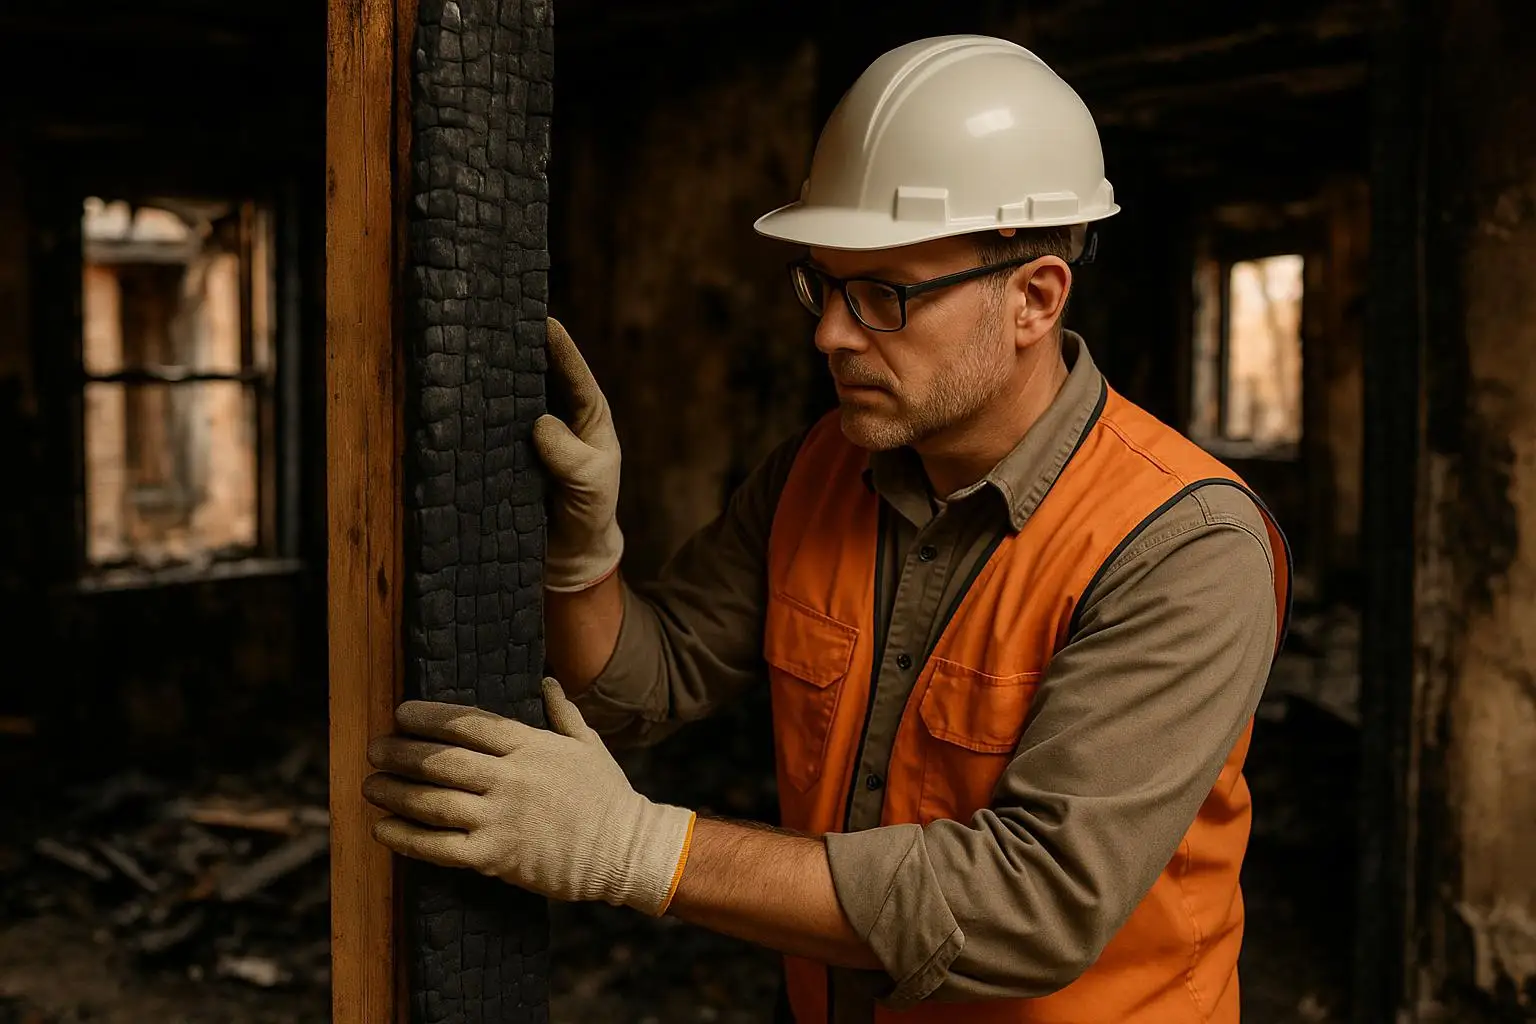
Step 3: Check Structural Damage
After completing your initial visual inspection, it’s time to dig deeper and assess the structure for any hidden damage. Fires can compromise the integrity of beams, walls, and foundations, even if the damage isn’t immediately visible.
According to the NFPA, structural fires caused an estimated $10.9 billion in property damage between 2015 and 2019, with 491,298 structural fires reported during that time. This highlights how crucial a detailed structural evaluation is for ensuring safety and planning repairs. Pay particular attention to load-bearing components to identify areas of concern.
Inspect Load-Bearing Parts
Start by examining foundations and load-bearing walls for cracks, shifts, or other signs of stress. Different materials react to fire in distinct ways, so tailor your inspection accordingly:
- Concrete: Look for cracks and spalling, which occur when high temperatures cause the surface to break apart.
- Steel Components: Watch for warping or buckling. Steel can also corrode when exposed to smoke containing acidic or alkaline elements, so check for visible deformation.
- Wooden Elements: Check for charring, sagging, or discoloration. The depth of charring can indicate how much strength the wood has lost. Don’t forget to inspect joints for internal charring, as this can weaken structural connections. Ceiling beams showing sagging or discoloration are also red flags for heat damage.
Don’t overlook flooring – signs like charring, buckling, or soft spots could indicate compromised support. Walls, floors, and ceilings may have hidden weaknesses that could lead to falling debris or structural failure. Warping or cracks in beams and supports might not have been noticeable during your initial walk-through.
Use Special Tools for Structure Assessment
Once you've visually inspected the load-bearing elements, use specialized tools to uncover hidden damage. Thermal imaging cameras are particularly effective for detecting temperature anomalies that could signal concealed heat pockets or structural weaknesses. As the Los Angeles Times puts it:
"Perhaps the best advance in fire equipment in the last 25 years – and the most expensive".
These cameras can also help identify moisture and areas weakened by heat.
Moisture meters are another essential tool. Use them on drywall and wood to measure water content, as moisture can promote mold growth within 24 to 48 hours. Ideally, keep humidity levels between 30–50% to minimize risk.
Borescopes and video inspection allow you to peer inside walls and cavities without causing major disruption. These tools are especially useful for spotting hidden moisture or fire damage.
Be sure to document everything – affected areas, moisture levels, and any visible damage. This information is invaluable for insurance claims and helps restoration professionals plan repairs. If you encounter significant structural damage or have concerns about the stability of load-bearing components, consult a structural engineer. They can provide a detailed evaluation and recommend the necessary steps to restore the building’s safety.
Step 4: Inspect Electrical and Mechanical Systems
Fire damage often extends beyond what’s visible, affecting internal systems like wiring, plumbing, and HVAC units. Heat, smoke, and water from firefighting efforts can create hidden hazards that compromise safety. After ensuring the structure is safe to enter, it’s crucial to assess these systems thoroughly. Always turn off power at the main panel before examining electrical components. If the panel shows signs of damage or you’re unsure how to proceed, contact a licensed electrician right away.
Check Electrical Components
Start by inspecting the main electrical panel for scorch marks, melted areas, or water stains – these are clear signs of damage that may require replacement. Even if circuit breakers seem intact, they could still be compromised. Carefully check wiring, outlets, and panel components for signs of heat damage or corrosion. Fire can melt wire insulation, and water used during firefighting might lead to rust or other issues in metal parts.
Before beginning, wear proper protective gear and ensure any tools you use are plugged into outlets protected by Ground Fault Circuit Interrupters (GFCIs). Avoid testing electrical components yourself – this is a job for a licensed electrician. Instead, document your observations with photos and detailed notes, which will be helpful for insurance claims or restoration planning.
Inspect Plumbing and HVAC Systems
Once electrical issues have been addressed, turn your attention to plumbing and HVAC systems. Even if these systems weren’t directly exposed to flames, they could still suffer damage. For instance, intense heat might cause components to melt, while smoke and soot can leave behind acidic residues that corrode metal over time. Look for signs of plumbing problems like low water pressure, discolored water, cold showers, or odd knocking sounds in the pipes. These could indicate damage to pipes, fixtures, or even the water heater.
HVAC systems are another area where fire damage can go unnoticed. Many HVAC-related fires stem from faulty electrical components. Watch for warning signs such as strange odors, unusual noises, or inconsistent humidity levels. If you notice anything unusual, shut off the system and call a professional technician.
Soot and smoke can infiltrate HVAC systems, leaving behind corrosive residues that may cause long-term damage. As Bill Wichers, an expert in the field, notes:
"Smoke alone will make things look ugly, but shouldn’t do any actual damage. You just need to wipe the smoke residue away so that you can be sure it’s not hiding any damage from heat or the fire itself".
While surface cleaning may address visible residue, contamination inside the HVAC system requires professional attention. Schedule an inspection and cleaning by qualified technicians. Professional duct cleaning can remove soot, debris, and other contaminants, and follow-up air quality issues can ensure your home is safe for your family.
Be sure to document everything – take photos and write detailed notes about the damage and its location. This information will be essential for filing insurance claims and helping restoration experts plan the necessary repairs.
Step 5: Look for Moisture and Mold Problems
After a fire, water used in suppression efforts can leave behind moisture, creating the perfect environment for mold to thrive and potentially weakening the structure. Mold can start forming within just 24 to 48 hours of water exposure, and unchecked moisture can lead to further damage over time.
As the EPA advises:
"The key to Beat Miamis Humidity Top Tips for a Mold Free Home is moisture control. If mold is a problem in your home, you should clean up the mold promptly and fix the water problem. Mold damages what it grows on. The longer it grows, the more damage it can cause".
Start with a visual inspection for telltale signs like water stains, peeling paint, warped surfaces, or visible mold. However, remember that moisture often hides in places like wall cavities or beneath damaged materials.
Use Moisture Detection Equipment
Once you’ve checked for visible signs, it’s time to confirm your findings with specialized tools. Professional-grade equipment can uncover hidden moisture that isn’t immediately apparent. For instance, thermal imaging cameras can detect cooler pockets of moisture trapped behind walls or under floors by picking up temperature differences.
Other tools can provide precise measurements:
- Moisture meters: Pin-type meters offer exact readings, while pinless meters can scan larger areas.
- Hygrometers: These measure relative humidity to ensure indoor levels remain between 30% and 50%.
- Borescope cameras: These allow you to inspect inside walls and hard-to-reach spaces.
Chemmaster Restoration emphasizes the importance of thorough detection:
"Thermal imaging technology allows us to provide a comprehensive assessment, ensuring that no area is left untreated. This thoroughness is essential for a safe and complete restoration."
Using these tools ensures no hidden moisture is missed, complementing earlier structural and system evaluations.
Stop Mold Growth
Once moisture is identified, it’s critical to act fast. Begin by extracting water and drying out materials. Tools like pumps, vacuums, dehumidifiers, and fans can help bring moisture levels down to below 15%.
Strategically place dehumidifiers, air movers, and fans to ensure airflow across all affected areas. Materials like insulation, carpets, and drywall that are too saturated to dry should be removed, as they can harbor mold spores. Treat exposed surfaces with antimicrobial solutions to kill existing mold and prevent further bacterial growth. Throughout the drying process, keep monitoring moisture and humidity levels, aiming for a safe range of 30–50% relative humidity.
For more complex situations, professional services like Total Care Restoration can provide the expertise and equipment needed to tackle hidden moisture and prevent mold. They also offer 24/7 emergency response, which is crucial for time-sensitive cases.
Unchecked water damage doesn’t just weaken the structure – it can also lead to serious health risks, including respiratory issues and allergic reactions from mold exposure. Taking swift action to manage moisture is essential for both safety and successful restoration.
Step 6: Document and Report All Damage
Once your physical inspection is complete, the next step is to document everything thoroughly. Proper documentation is the backbone of insurance claims and restoration planning. Missing or incomplete records can slow down claims or even reduce your compensation. The aim here is to create a detailed account of all the damage you observed during your inspection. These records will serve as evidence for your claim and as a guide for the restoration process.
Organize Your Inspection Records
Start by taking a methodical approach to documenting the damage. Use clear photos and videos to capture the condition of each room, noting dimensions and key structural features. Take wide shots from multiple angles, then zoom in on specific areas of damage for detailed images. Where possible, include objects for scale and add annotations to your photos to provide context.
To make your records easier to interpret, consider using a color-coded system to categorize the severity of the damage. For example:
- One color could indicate severe structural damage.
- Another could highlight areas needing professional attention.
- A third could mark minor cosmetic issues.
This visual system helps insurance adjusters and restoration teams quickly identify and prioritize repairs.
Keep a detailed inventory of damaged items. For each item, note its description, approximate age, brand, and purchase price. If you have receipts, manuals, warranty details, or older photos of your home’s interior, include them as supporting evidence. Store all these records digitally in the cloud, using clear file names that include the date, location, room, and type of damage. Additionally, track any expenses related to the damage. These well-organized records not only assist in the claims process but also guide restoration professionals in their work.
Use Damage Rating Charts
To effectively communicate the extent of the damage to insurance companies and restoration experts, consider using a damage rating chart. This tool provides a clear, standardized way to describe the severity of each issue. Here’s an example:
| Level | Description | Action |
|---|---|---|
| Minor | Cosmetic damage, slight smoke odor or soot | Cleaning and minor repairs |
| Moderate | Noticeable structural concerns or water/electrical issues | Professional assessment needed |
| Severe | Major structural damage or extensive fire destruction | Immediate professional intervention |
Visual cues can also help in assessing damage. For instance, concrete that has turned pink or red may indicate exposure to high heat, while deeply charred wood could signal structural weakening. Techniques like tapping on walls can sometimes reveal hidden damage.
Once your documentation is complete, share it with your insurance adjuster as soon as possible. This proactive step ensures a smoother claims process and helps set the stage for timely restoration. When it’s time to move forward with repairs, you might want to consult with experts like Total Care Restoration to guide you through the process from start to finish.
Conclusion: Getting Ready for Restoration
A thorough inspection lays the groundwork for a successful restoration process. With your inspection report in hand, you now have a clear guide for the necessary steps to bring the property back to its original condition.
Start by securing the property to prevent further damage. This includes boarding up windows and doors, installing temporary fencing, and Emergency Roof Tarping with tarps. These precautions are essential to protect the site while you plan the next stages of restoration.
Next, address any standing water immediately to avoid mold growth and additional damage. Professional-grade water extraction tools can help remove moisture from hidden areas that might otherwise be overlooked.
The restoration process itself typically involves several key steps: Top 7 Fire Odor Neutralization Techniques, repairing or rebuilding damaged structures, salvaging and restoring contents, and performing a final safety check to ensure the property is ready for use.
Make sure to contact your insurance company as soon as possible, providing the detailed documentation you gathered during the inspection. Photos, videos, and written records will streamline the claims process and help establish a clear timeline for repairs.
For assistance, Total Care Restoration offers 24/7 certified Commercial. With direct insurance billing and a focus on securing your property quickly, they can turn your inspection efforts into a comprehensive recovery plan, helping you manage the restoration process efficiently and effectively.
FAQs
What tools are essential for identifying hidden fire damage during an inspection?
When it comes to spotting hidden fire damage, professionals use a mix of specialized tools and keen observation. Thermal imaging cameras are a standout tool – they pick up heat patterns, making it easier to find hidden hotspots. Another handy tool is soot sponges, which can detect smoke residue on walls and other surfaces. Alongside these, inspectors pay close attention to visual signs like discoloration, soot stains, or warped materials. Together, these methods ensure no damage goes unnoticed during an inspection.
What steps should I take to document fire damage for an insurance claim?
To document fire damage effectively for your insurance claim, start by capturing clear photos and videos of all affected areas. Take wide-angle shots to show the overall damage and close-ups to highlight specific issues. Be thorough – include every room and any outdoor areas that were impacted.
Then, create a detailed inventory of damaged items. For each item, note its condition, estimated value, and any identifying details. If you have receipts or older photos of these items, gather them as proof to strengthen your claim. Don’t forget to keep important documents like your insurance policy, proof of loss forms, and repair estimates handy.
Lastly, stay organized by keeping all evidence, receipts, and communications with your insurer in one place. Filing your claim quickly and providing complete documentation can make the process much smoother.
What steps should I take immediately after a fire to prevent mold growth?
To stop mold from taking hold after a fire, you need to move fast. Start by making sure everything is completely dry. This means getting rid of any standing water and using tools like fans or dehumidifiers to boost airflow. If something is heavily water-damaged and beyond saving, it’s best to throw it out.
Keep the humidity in the affected area between 30-50%, and fix any leaks or moisture problems right away. Use mold-inhibiting cleaners on surfaces, and make sure everything is thoroughly dried within 24-48 hours. Acting quickly can help prevent further damage to your property and reduce potential health risks.
Related posts
Want to Learn More?
Read our comprehensive guide covering everything you need to know about this topic.
The Complete Guide to Fire Damage RestorationNeed Professional Help?
Our expert team is ready to assist with your fire damage restoration needs.
View Fire Damage Restoration Services