How to Clean Fire-Damaged Concrete
Dealing with fire-damaged concrete? Here’s what you need to know:
Fire can weaken and damage concrete in ways that aren’t immediately visible. Cleaning it properly is essential to restore its appearance and prevent further deterioration. Here’s a quick summary of key steps:
- Assess the Damage First: Check for cracks, spalling (flaking), discoloration, and structural risks. Severe damage may require professional help.
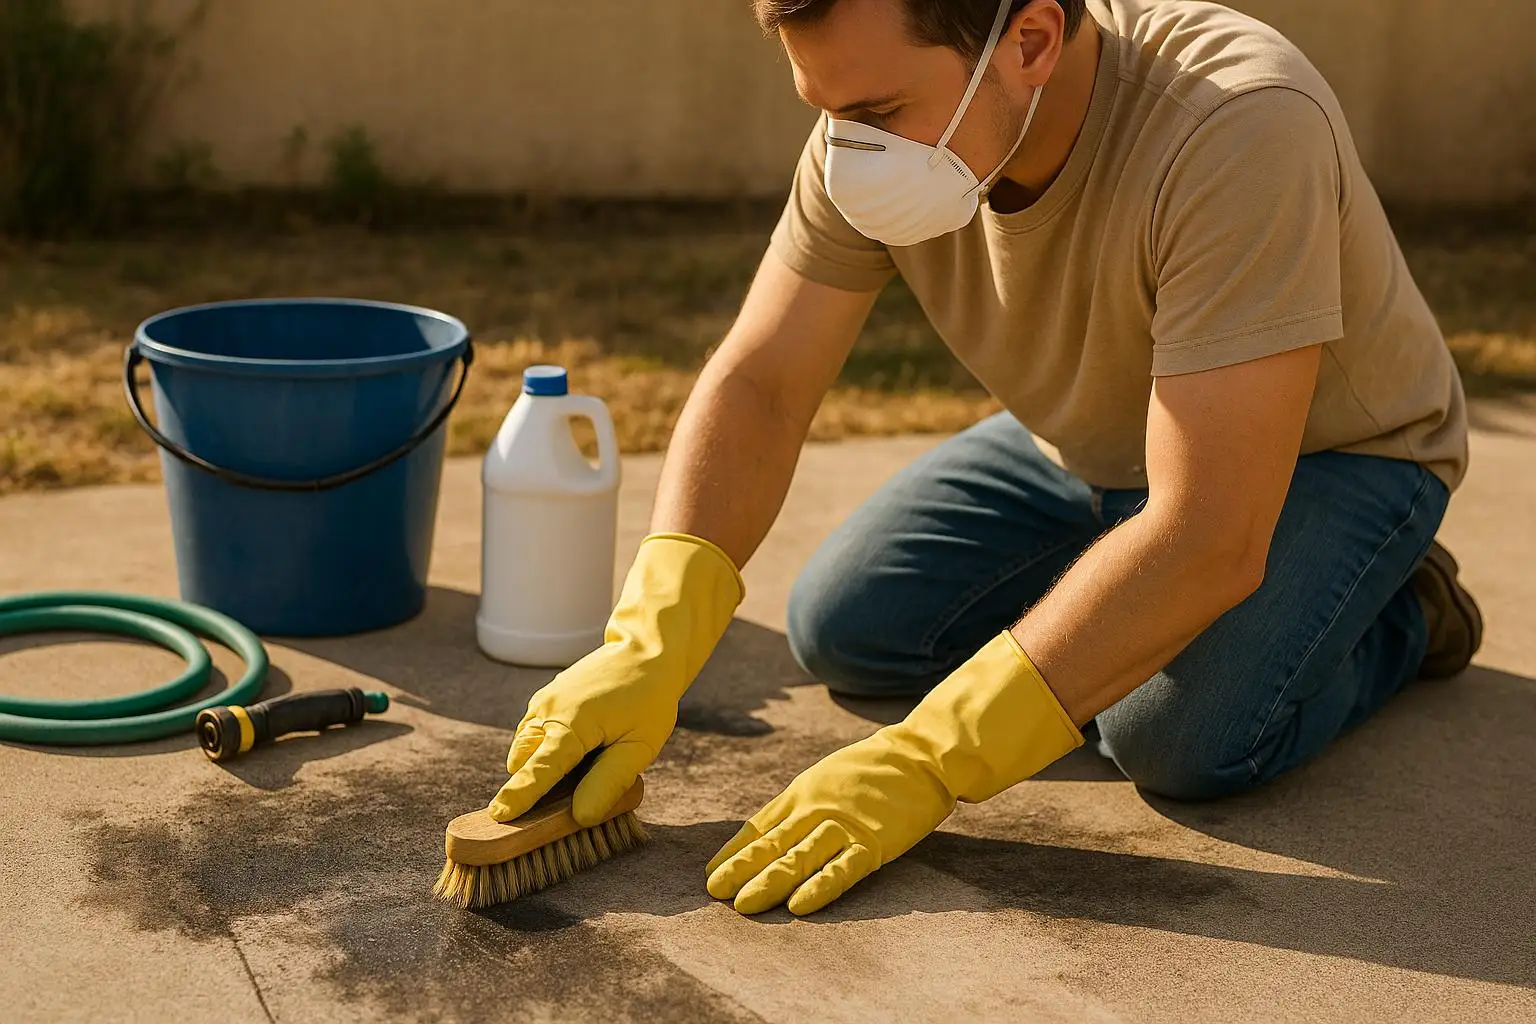
- Safety Comes First: Wear proper protective gear (N95 respirator, gloves, goggles) and ensure good ventilation. Test for hazardous substances like lead or asbestos.
- Use the Right Tools: Start with basic tools like pressure washers (3,000 PSI), stiff brushes, and industrial vacuums. For deeper stains, use chemical cleaners like ammonia or sodium carbonate.
- Advanced Methods for Tough Stains: Abrasive blasting, sponge blasting, or dry ice cleaning can help with severe damage.
- Seal and Protect: After cleaning, apply a penetrating or film-forming sealer to protect the concrete from future damage.
Quick Tip: Always neutralize chemical residues before sealing to ensure proper adhesion.
For step-by-step instructions, safety tips, and detailed cleaning methods, keep reading!
Cleaning Soot From Concrete / Fire Restoration
Safety Steps Before Starting the Cleaning Process
Cleaning fire-damaged concrete is no simple task – it comes with hidden dangers that can pose serious risks if not handled carefully. Before diving into the cleanup, it’s essential to identify potential hazards and take the necessary safety precautions.
Identifying Potential Hazards
Fire Damage Restoration can weaken key structural elements like load-bearing walls, roof supports, and foundations, making them vulnerable to collapse . Beyond structural risks, fires release harmful substances such as carbon monoxide, formaldehyde, and asbestos fibers. Fine soot and ash particles may linger in the air, posing respiratory risks and settling into small cracks, where they can continue to cause problems over time.
Water used to extinguish the fire complicates matters further. Within just 24–48 hours, mold can start growing on fire-damaged concrete, adding another layer of health risks.
Here are some hazardous substances often found at fire cleanup sites:
| Hazardous Substance | Health Risk | Sources |
|---|---|---|
| Arsenic | Carcinogen, vomiting, nerve damage | Arsenic-treated wood, semiconductors, food |
| Cadmium | Carcinogen, lung and bone damage | Metal plating, pigments, batteries, plastics |
| Lead | Brain and kidney damage | Older paints, pipes, ceramics, consumer products |
| PAHs | Carcinogen, kidney and liver damage | Burning coal, gas, and organic materials (soot) |
| PCBs | Nausea, vomiting, weakened immune system | Transformers, capacitors, cable insulation, older electronics |
Before beginning any cleanup, it’s crucial to test for asbestos, lead, or other harmful substances. If there’s visible structural damage, consider bringing in a structural engineer for a detailed assessment.
Once you’ve identified the risks, you can choose the appropriate protective gear to keep yourself safe.
Essential Personal Protective Equipment (PPE)
Proper PPE is non-negotiable when working in fire-damaged areas. To avoid inhaling harmful particles like soot or toxic fumes, use an N95 or P95 respirator – standard dust masks won’t cut it.
Protect your skin and eyes with chemical-resistant gloves and safety goggles or a full-face shield. Wear long-sleeved shirts, long pants, and closed-toe shoes to cover your body completely. Make sure your respirator fits correctly and is well-maintained to ensure maximum protection.
Setting Up a Safe Work Area
Once you’re equipped with the right PPE, it’s time to prepare the work area. Ventilation is key – opening windows and doors and using fans can help circulate fresh air and push toxic particles away from your workspace. Turn off the HVAC system to avoid spreading contaminants throughout the building.
Before starting, inspect the area for any additional risks like structural damage, smoke odors, or exposed electrical wiring. Look out for cracked walls, sagging ceilings, and standing water, as these could lead to further complications.
"Ensure proper ventilation by opening windows and using air purifiers to reduce airborne smoke residue and soot particles." – All Nation Restoration
Secure the area to prevent unauthorized access and protect it from weather-related damage. Keep in mind that soot is highly acidic and can cause permanent staining or corrosion if not addressed quickly.
Tools and Materials for Concrete Cleaning
Getting the right tools and materials is key to successfully cleaning concrete. The equipment you use will depend on the extent of the damage, and knowing when to switch from basic to professional-grade tools can make the process both safer and more efficient.
Basic Cleaning Equipment
To tackle soot and burn marks, start with some essential tools. A heavy-duty gas pressure washer with at least 3,000 PSI is ideal for lifting smoke stains, but if that’s not available, an electric pressure washer rated over 2,000 PSI can work – it just might take a few extra passes. For scrubbing, go with stiff-bristled brushes made of polypropylene or other non-metallic materials to avoid scratching the concrete.
Other helpful items include scrub brushes, buckets, rags, putty knives, industrial vacuums, hoses, and squeegees. An industrial vacuum is particularly useful for clearing loose debris before you start wet cleaning. A garden hose is another must-have for pre-wetting the concrete and rinsing away dirt.
Once you’ve tackled loose residue, you can move on to chemical cleaners for deeper stain removal.
Chemical Cleaners and How to Use Them
Chemical cleaners are great for breaking down fire residue that scrubbing alone can’t handle. Alkaline degreasers with sodium metasilicate or ammonium hydroxide are effective for lifting oily smoke deposits from concrete pores. For fresh soot, mix 1 part household ammonia with 3 parts water to dissolve the residue.
Sodium carbonate is another option, especially for neutralizing chemicals left by fire suppressants. For a milder approach, a mixture of baking soda, dish soap, and water works well to remove burn marks without harsh chemical reactions. For tougher stains, you might need acid or alkaline cleaners designed specifically for concrete. In extreme cases, professionals sometimes use trichloroethylene in a bandage treatment or apply sodium hypochlorite (household bleach) as a poultice.
When using chemical cleaners, always read the product labels, work in a well-ventilated area, wear protective gear, and rinse thoroughly after cleaning. Test any cleaner on a small, hidden area first to make sure it won’t discolor or damage the surface.
If these steps don’t deliver the results you need, it might be time to consider advanced equipment.
Advanced Equipment Options
For heavily damaged concrete, professional-grade tools can make a big difference. Abrasive blasting is one of the most effective methods for deep cleaning and preparing concrete surfaces. Unlike pressure washing, it removes coatings, stains, and contaminants at a deeper level. It can even create decorative finishes if desired. Wet abrasive blasting is especially useful since it reduces airborne dust by up to 92%, making it safer for both operators and the surrounding area.
Professional abrasive and shot blasting machines are ideal for cleaning large areas quickly. When choosing equipment, consider the size of your project and the type of abrasive media you’ll need.
Media selection matters, too. For standard concrete cleaning, materials like garnet, crushed glass, and coal slag are effective. For more delicate surfaces, gentler options like walnut shells or baking soda are better. Wet abrasive blasting is particularly helpful for fragile surfaces, as it controls both heat and pressure to prevent etching or pitting.
Step-by-Step Concrete Cleaning Process
Start with preparation, then move through cleaning methods from basic to advanced. A systematic approach ensures effective results while keeping safety a priority.
Initial Check and Area Preparation
Before diving into any cleaning, have the concrete assessed by a structural engineer. Fire damage can weaken concrete in ways that aren’t immediately obvious, so a professional evaluation is critical to avoid accidents or further structural issues.
Once you’ve received the go-ahead, begin by clearing the surface of loose debris. Use an industrial vacuum to remove dust and dirt that could interfere with cleaning. Afterward, vacuum again to catch any debris dislodged during the initial pass. Follow this by lightly pressure washing the area to eliminate fine particles and dust. Keep the pressure moderate – this step is about prepping the surface, not tackling stains yet. Proper preparation sets the stage for effective and safe cleaning.
Basic Methods for Soot and Burn Marks
For soot and burn marks, start with gentle cleaning solutions that won’t harm the concrete. The goal is to loosen fire residue without causing damage.
For smoke stains, mix one part household ammonia with three parts water. Apply the solution to the stained area and let it sit for 3–5 minutes. Then, scrub in a circular motion using a non-metallic brush. Rinse thoroughly with clean water, and repeat as needed. This method is particularly effective for breaking down the oily residue left by smoke.
For general soot removal, use an acid or alkaline cleaner. Apply it generously to the affected area, scrub thoroughly, and rinse with water. Allow the surface to dry completely before assessing the results. If stains persist, repeat the process or escalate to using a pressure washer for the more stubborn spots.
If the fire affected nearby brick surfaces or textured concrete, mix water and white vinegar to loosen soot. Scrub the area with a toothbrush dipped in baking soda, then rinse with warm water and a small amount of bleach. This approach works well for areas requiring precision.
Advanced Methods for Tough Stains
When basic methods don’t fully remove stains, advanced techniques become necessary. These methods often call for specialized tools and extra safety precautions but can restore even severely damaged concrete.
Abrasive blasting is highly effective for deep, stubborn stains that resist chemical cleaning. It’s especially useful when fire damage has caused cracks or spalling in the concrete, as it can prepare the surface for a new skim coat. The level of roughness created will depend on the type of new coating or layer being applied.
Sponge blasting offers another option, combining soot removal with surface texturing in one step. This method allows for more control over the final texture.
Dry ice cleaning is a great choice for delicate areas or situations where you want to avoid the mess of wet cleaning. It requires specialized equipment but can effectively remove deep scorch marks without harming the underlying concrete.
Be mindful of runoff during advanced cleaning. Collect all liquid waste to prevent environmental contamination. Fire residue mixed with cleaning chemicals can be harmful, and many regions have strict disposal regulations. Proper disposal aligns with the safety guidelines mentioned earlier.
If the damage is extensive or you’re unsure about handling fire-damaged concrete, it’s wise to consult professionals. For expert assistance, you can reach out to Total Care Restoration at totalcarerestoration.com.
Protection and Care After Cleaning
Once the cleaning process is complete and stains have been addressed, it’s crucial to take steps to protect and maintain the concrete. Proper post-cleaning care can extend the life of the surface and help avoid expensive repairs down the line.
Adding Protective Sealants
After the concrete has dried, applying a high-quality sealer is a smart move. Sealers act as a shield, protecting the surface from water, stains, deicing salts, and other harmful substances, while also increasing its durability and longevity. There are two main types of sealers to choose from:
- Film-forming sealers: These include acrylics, epoxies, and urethanes, which create a protective layer on the surface.
- Penetrating sealers: These, such as silanes, siloxanes, silicates, or siliconates, seep into the concrete to form a chemical barrier.
Here’s a quick breakdown of the differences between these two types:
| Sealer Type | Best For | Appearance | Durability | Maintenance |
|---|---|---|---|---|
| Film-forming (Acrylics, Epoxies, Urethanes) | High-gloss or decorative finishes | Glossy, enhanced look | Prone to wear; may need frequent reapplication | Higher upkeep |
| Penetrating (Silanes, Siloxanes, etc.) | Outdoor use, natural finishes | No change to appearance | Longer-lasting; resistant to peeling or wear | Lower upkeep |
For outdoor concrete, penetrating sealers are often the better choice due to their durability and ability to maintain a natural look. However, if a glossy, polished finish is the goal, a film-forming sealer might be more appropriate. Whichever type you choose, make sure it’s a breathable sealer to prevent moisture from getting trapped, which can lead to damage. Ideally, sealers should be applied after the concrete has cured for at least 28 days or once it is completely dry.
Removing Leftover Chemicals
Before sealing, it’s essential to clear away any chemical residues left from the cleaning process. Residues, especially from acids, can interfere with how well the sealer adheres to the surface. Neutralizing the concrete is a key step. Use a neutralizing solution like baking soda, TSP, or ammonia, and follow these steps:
- Spread the neutralizing solution evenly across the cleaned surface.
- Use a soft-bristled push broom to gently scrub the area and loosen residues.
- Rinse thoroughly, avoiding harsh scrubbing, and change rinse water often to prevent spreading contaminants.
- For outdoor areas, more aggressive scrubbing followed by pressure washing might be necessary.
- Rinse the surface twice with clean water after neutralizing. While a slight powdery residue may remain, excessive residue should be removed to avoid streaking or discoloration after sealing.
Once the surface is neutralized and rinsed, it’s ready for sealing and future maintenance.
Regular Checks and Upkeep
Even after cleaning and sealing, fire-damaged concrete requires ongoing attention. Monthly inspections can help spot micro-cracks, worn sealer, or new stains – especially in areas that experienced severe fire damage. For a more thorough check, schedule quarterly inspections to ensure the structure remains safe and to catch any progressive damage early.
Take photos and measurements during these inspections to create a detailed record of the concrete’s condition over time. This documentation can be invaluable for tracking changes and planning maintenance. To further protect the structure, consider using fire-resistant concrete mixtures or applying fireproof coatings during any repair work. Staying proactive with regular assessments and upkeep can significantly improve the concrete’s durability and protect it from future harm.
Key Points for Fire-Damaged Concrete Cleaning
Prioritize safety above all else when working with fire-damaged concrete. Always use the recommended personal protective equipment (PPE) mentioned earlier, and ensure the area is well-ventilated, especially when handling solvents. Never mix chemicals, and carefully read product labels to understand proper usage. These precautions are essential before moving on to the cleaning methods discussed earlier.
Start with mild cleaning solutions before turning to stronger options. Begin with simple agents like baking soda or dish soap, gradually moving to more potent cleaners if necessary. A pressure washer with a minimum of 3,000 PSI can be highly effective, but remember to neutralize the concrete surface after using chemical cleaners. If the damage is severe or raises structural concerns, it’s crucial to consult professionals who can ensure safe and effective restoration.
"EXCELLENT VENTILATION MUST BE PROVIDED WHEREVER ANY SOLVENT IS USED. USE RESPIRATORS WITH SOLVENT FILTERS. NOTE: SOME OF THE SOLVENTS LISTED ARE KNOWN CARCINOGENS AND MAY BE BANNED IN SOME STATES."
Soot contains harmful carcinogens that can pose serious health risks through inhalation, ingestion, or skin contact. For extreme cases, companies like Total Care Restoration offer 24/7 emergency services with certified technicians to restore your property while prioritizing safety.
FAQs
When should you call a professional to assess fire-damaged concrete instead of trying to clean it yourself?
If your fire-damaged concrete has visible cracks, spalling (flaking or chipping), severe discoloration, or noticeable scorch marks, it’s a clear indication that you need a professional assessment. Other warning signs include concrete that feels unusually hot to the touch, appears unstable, or shows structural problems like leaning or shifting. These issues often point to more serious, underlying damage that only an expert can properly evaluate.
Trying to clean or repair heavily damaged concrete on your own can be dangerous. Hidden structural weaknesses might go unnoticed and worsen over time. A professional inspection ensures the damage is thoroughly assessed and fixed, helping to maintain the safety and stability of your property.
How can I check for hazardous materials like asbestos or lead before cleaning fire-damaged concrete?
Before diving into any cleanup, you need to figure out if hazardous materials like asbestos or lead are present. The safest way to do this is by hiring a licensed professional who specializes in testing for these substances. They’ll know how to collect samples properly and follow strict safety measures to reduce risks.
If your property was built before 1980, there’s a greater chance it contains asbestos or lead. It’s best not to disturb any materials that might be hazardous – leave the testing to trained experts. And don’t forget: anyone involved in the process should wear the right personal protective equipment (PPE) to stay protected.
What’s the difference between film-forming and penetrating sealers for fire-damaged concrete?
When dealing with fire-damaged concrete, both film-forming sealers and penetrating sealers offer distinct advantages and challenges.
Film-forming sealers work by creating a protective layer on the surface. This layer is great for blocking stains and odors caused by smoke, making it an excellent choice if restoring the concrete’s appearance is your main goal. However, these sealers tend to wear down over time, meaning you’ll likely need to reapply them every few years, which adds to maintenance demands.
Penetrating sealers, in contrast, absorb into the concrete, providing durable, long-lasting protection without altering the surface’s look. They’re a low-maintenance option and hold up well over time. That said, they’re not as effective as film-forming sealers when it comes to sealing in smoke odors.
The best choice ultimately depends on what matters most to you – whether it’s maintaining the concrete’s appearance, controlling odors, or minimizing upkeep in the long run.
Related posts
Want to Learn More?
Read our comprehensive guide covering everything you need to know about this topic.
The Complete Guide to Fire Damage RestorationNeed Professional Help?
Our expert team is ready to assist with your fire damage restoration needs.
View Fire Damage Restoration Services