Roof Tarping Completely Explained
When a storm damages your roof, every minute counts. Water intrusion can quickly escalate from a minor inconvenience to a full-blown disaster—ruining ceilings, walls, flooring, furniture, and creating the perfect conditions for mold growth. Emergency roof tarping is your first line of defense, providing critical temporary protection while you arrange for permanent repairs.
In this comprehensive guide, we'll walk you through exactly how professional roof tarping works, what materials we use, and why proper installation makes all the difference in protecting your home.
Step 1: Damage Assessment and Safety Preparations
Before the tarp goes on, our restoration professionals follow a strict safety and evaluation protocol. Rushing this step can lead to inadequate coverage or, worse, injuries from unstable roofing surfaces.
1. Initial Damage Evaluation
We begin by assessing the visible damage from the ground and, if safe, from a ladder. This includes looking for:
- Missing or broken shingles
- Holes or punctures from debris
- Warped or sagging areas indicating structural compromise
- Soft spots that indicate water saturation
- Visible light coming through the roof deck (from inside the attic)
- Signs of previous repairs that may have failed
Our technicians document all damage with photos and detailed notes, which becomes essential documentation for your insurance claim later.
2. Interior Inspection
Before addressing the exterior, we also assess the interior of your home. This helps us understand:
- The extent of water intrusion
- Which rooms and areas are affected
- Whether water is actively entering the structure
- Any electrical hazards near water damage
- Furniture and belongings that need immediate protection or relocation
3. Clearing Roof Debris
The next step is to remove any loose debris to prevent further damage and ensure the tarp lays flat. This can include:
- Tree limbs and branches
- Leaves and moss buildup
- Shingles or tile fragments
- Windblown debris like garbage or construction material
- Damaged satellite dishes, antennas, or rooftop equipment
Clearing the roof not only protects your tarp but prevents sharp or heavy debris from puncturing it or making the roof surface unstable. A clean surface also allows us to better assess the full extent of damage that may have been hidden beneath debris.
Step 2: Leak Containment and Temporary Patching
If a leak is actively dripping water inside your home, immediate action is required before tarp installation can begin.
Interior Water Management
While the exterior team prepares for tarping, we may deploy interior mitigation measures:
- Placing buckets or containers under active leaks
- Using wet/dry vacuums for standing water
- Setting up air movers and dehumidifiers to begin drying
- Protecting furniture with plastic sheeting
- Relocating valuable items away from affected areas
Exterior Preparation
On the roof, we may use plywood or other underlayment materials to contain active leaks. This serves as an additional barrier beneath the tarp and protects your ceiling and interior from immediate water damage.
We'll also ensure that any exposed areas are completely dry before installing the tarp to reduce the risk of mold growth underneath. Trapping moisture beneath a tarp creates a warm, humid environment that mold thrives in—exactly what we want to avoid.
Step 3: Measuring and Sizing the Tarp
A proper tarp installation begins with accurate measurements. This step is more critical than many homeowners realize—an improperly sized tarp can actually make things worse by channeling water into areas that weren't previously affected.
Tarp Sizing Guidelines
A roof tarp should:
- Fully cover the damaged section of the roof with no gaps
- Extend at least 4 feet past the damage in all directions
- Overlap the roof ridge (peak) to prevent water from running under it
- Hang past the eaves to direct water away from the structure and into gutters
- Account for any irregular roof features like vents, skylights, or chimneys
Common Sizing Mistakes
Choosing a tarp that's too small will result in leaks, while one that's too large may be difficult to secure in windy conditions and can create "sail" effects that tear the tarp loose. In South Florida's high-wind environment, proper sizing is especially critical.
We carry multiple tarp sizes on every service call to ensure we have the right fit for your specific situation.
Step 4: Safety Considerations (Especially for Homeowners)
Important: We do not recommend climbing onto a damaged or wet roof without professional training and proper safety gear. Slippery surfaces, hidden structural weaknesses, and loose debris can turn a roof into a dangerous environment.
The Risks of DIY Roof Tarping
Every year, emergency rooms across Florida see numerous injuries from homeowners attempting DIY roof repairs after storms. Common hazards include:
- Slippery surfaces from rain, algae, or loose granules
- Hidden structural damage that may cause the roof to collapse under weight
- Electrical hazards from damaged wiring or downed power lines
- Heat exhaustion when working in Florida's intense sun
- Falls from ladders or roof edges
If You Must Inspect Your Roof
If you absolutely must inspect your roof before professionals arrive:
- Use a stable extension ladder with someone spotting you at all times
- Wear non-slip work boots with good ankle support
- Use thick work gloves and long-sleeved protective clothing
- Wear safety goggles to protect against debris
- Bring a flashlight, even during the day, to check dark areas
- Never walk on a roof if it is visibly sagging, cracked, or saturated
- Stay away from power lines and any downed electrical wires
- Do not go on the roof during rain, high winds, or if more severe weather is approaching
When in doubt, wait for professionals. Your safety is more important than a quick assessment.
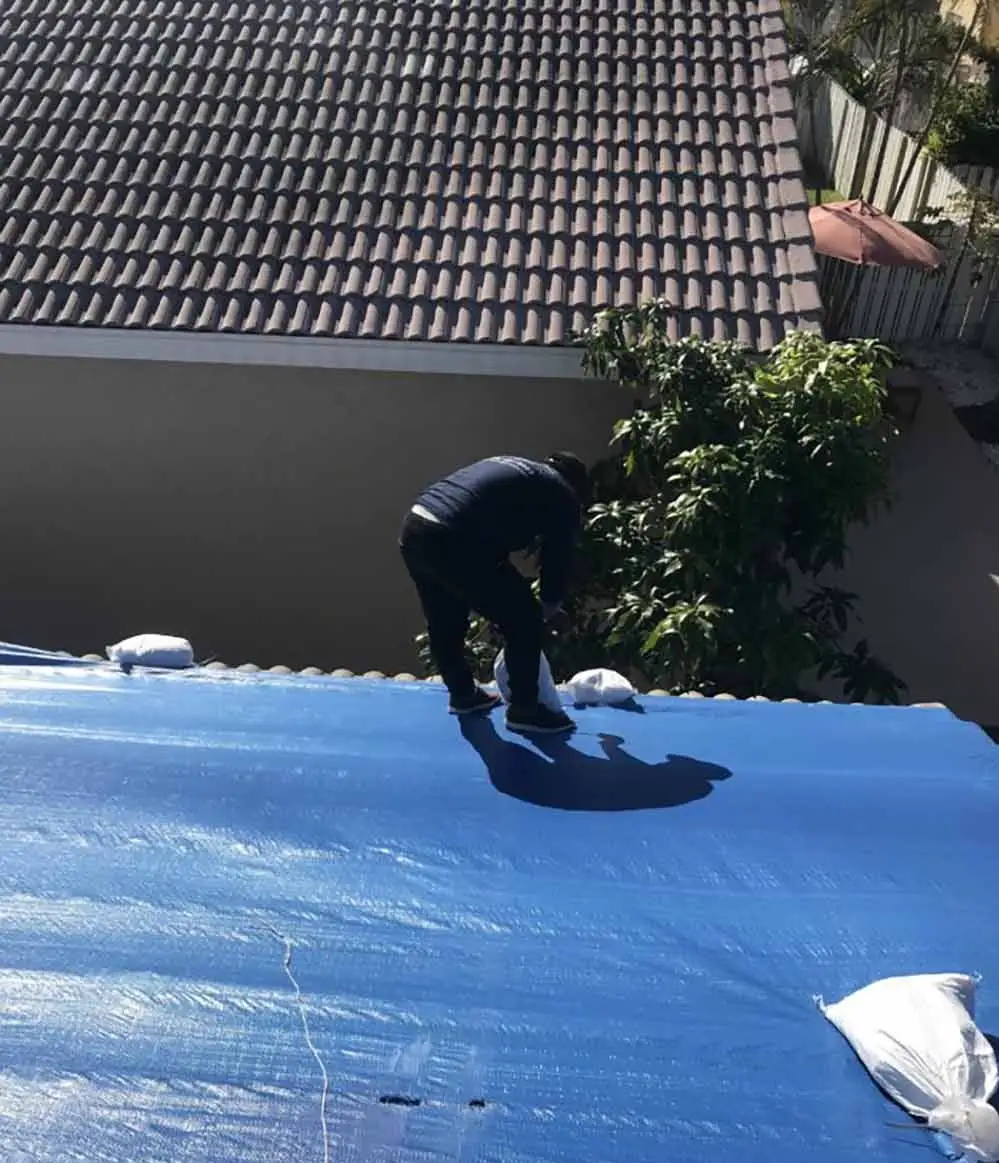
Step 5: The Roof Tarp Installation Process
Once the roof is prepped, dry, and measured, the installation begins. Our technicians follow a proven process developed over years of storm response in South Florida.
1. Securing Anchor Boards
Pressure-treated lumber (typically 2x4s) is screwed around the damaged area, anchoring the tarp in place. These boards serve multiple purposes:
- Keeping the tarp tight and wrinkle-free for maximum water-shedding
- Preventing wind from lifting or shifting the tarp
- Distributing the holding force across a larger area
- Providing a solid attachment point that won't pull through the tarp material
We position these boards strategically to ensure the tarp stays secure even in high winds.
2. Tarp Application
The tarp is wrapped around the anchor boards and stretched across the roof surface, pulled as tight as possible. A second layer of lumber may be added on top of the tarp edges for extra wind resistance.
Key installation techniques include:
- Eliminating wrinkles and folds that could collect water
- Ensuring the tarp slopes properly for water drainage
- Overlapping any seams by at least 6 inches
- Creating clean edges that won't flap in the wind
3. Fastening the Tarp
We use deck screws, preferably driven into the roof rafters rather than just the roof deck, to avoid compromising the structural integrity. In high-risk areas, we also use rubber washers to create a watertight seal around screws. This protects the roof structure from further leaks at the fastening points.
Screw placement is carefully planned to:
- Hit solid framing members whenever possible
- Avoid creating new entry points for water
- Maintain adequate spacing for wind resistance
- Allow for easy removal when permanent repairs are ready
What Type of Tarp Is Used?
Not all tarps are created equal. The blue tarps you see at hardware stores are fine for covering firewood, but they're not designed to protect your home from Florida's intense sun and storms.
We use heavy-duty polyethylene tarps specifically rated for roof applications, typically featuring:
- Waterproof construction with sealed seams
- UV-resistant coating to prevent degradation from Florida's intense sunlight
- Reinforced grommets at regular intervals for secure fastening
- Double-layered edges that resist tearing
- High mil thickness (typically 10-12 mil) for durability
- Available in various sizes (usually 20×20, 30×40, or larger)
- Designed to withstand wind and rain for weeks or months
Why Quality Matters
A cheap tarp might save a few dollars upfront, but it can fail when you need it most—during the next storm. We've seen cases where inferior tarps tore loose within days, causing additional damage and requiring emergency re-tarping.
Our commercial-grade tarps are specifically chosen for South Florida conditions and have proven their durability through countless hurricane seasons.
How Long Does a Roof Tarp Last?
A properly installed tarp can last up to 90 days, depending on weather conditions. In ideal conditions with no additional storms, some tarps remain effective even longer.
However, tarps are not a permanent solution—they are designed to give you time to:
- Schedule a roofing contractor for permanent repairs
- File and process an insurance claim
- Avoid further structural damage and water intrusion
- Protect your interior while permanent repairs are made
- Make informed decisions about repair options without pressure
When to Re-Tarp
Even a well-installed tarp may need attention over time. Watch for:
- Visible wear, tears, or punctures
- Loose edges or fasteners
- Water pooling on the tarp surface
- New leaks appearing inside
- Approaching severe weather that may stress the installation
We offer tarp inspection services and can quickly address any issues to maintain protection until your permanent repairs are complete.
Insurance and Roof Tarping
Most homeowner's insurance policies cover emergency tarping services, especially if the damage was caused by a covered peril (e.g., storm, fire, tree fall). Emergency tarping is considered a "reasonable step to prevent further damage," which insurance companies appreciate because it limits their overall liability.
Steps to Maximize Your Claim
To ensure smooth claim processing, you should:
- Document all damage with photos and video before any repairs
- Keep detailed receipts from all tarp-related work
- Contact your insurance company promptly to report the damage
- Don't dispose of damaged materials until your adjuster has seen them
- Request a copy of your complete policy to understand your coverage
- Keep a log of all communications with your insurance company
How We Help with Insurance
We work directly with many insurance companies and can help streamline the claim process for you. Our documentation package includes:
- Detailed damage assessment reports
- Before and after photographs
- Itemized invoices that meet insurance requirements
- Direct communication with adjusters when requested
- Moisture readings and testing results
Common Causes of Roof Damage in South Florida
Understanding what damages roofs helps you stay prepared. The most common causes we see include:
Storm-Related Damage
- Hurricane and tropical storm winds that lift shingles and tiles
- Wind-driven rain that penetrates compromised areas
- Hail damage (less common in South Florida but still possible)
- Tornadoes and waterspouts that can cause severe localized damage
Debris Damage
- Falling tree limbs during storms or due to disease/age
- Flying debris from neighboring properties
- Construction materials blown from nearby work sites
Age and Wear
- Deteriorated shingles or tiles that become brittle over time
- Failed flashing around vents, skylights, and chimneys
- Clogged gutters causing water backup under roofing materials
Why You Should Choose Total Care Restoration
At Total Care Restoration, we bring years of experience in emergency response, structural drying, and storm damage mitigation. Here's why we're trusted across Miami and South Florida:
- Fast 24/7 Emergency Response – We answer the phone day or night, weekends and holidays included
- Licensed and Insured Professionals – Full credentials and coverage for your protection
- High-Grade Materials and Equipment – Commercial-quality tarps and professional installation
- Insurance Claim Assistance – We help document everything and work directly with your carrier
- Full-Service Restoration – From emergency tarping through complete roof repair and interior restoration
Our Service Area
We proudly serve all of Miami-Dade County, Broward County, and surrounding South Florida communities. No matter where you are in our service area, we can typically arrive within hours of your call.
Contact Us Today for Emergency Roof Tarping in Miami
Don't let roof damage turn into a major disaster. Whether you're dealing with hurricane aftermath, fallen trees, or a sudden roof leak, Total Care Restoration is here to help.
📞 Call us now for 24/7 emergency service 📝 Request a free estimate online 🔧 Ask about our full suite of water, fire, and mold restoration services
For more tips on keeping your roof in top condition year-round, read our guide on How Roof Maintenance Prevents Storm Damage.
Total Care Restoration — Protecting your home. Restoring your peace of mind.
Want to Learn More?
Read our comprehensive guide covering everything you need to know about this topic.
The Complete Guide to Storm Damage Restoration and Roof Protection in FloridaNeed Professional Help?
Our expert team is ready to assist with your storm damage restoration needs.
View Storm Damage Restoration Services